Outsourcing Bookkeeping | Small Business Advisory Group, Inc (559) 298-7585

Create an Easy, Head-Turning Elevator Speech

You’re sitting in a room with 30 other business entrepreneurs. Each of you has one minute to introduce themselves to the group. You are number 25 to speak. Will anyone listen? What can you do or say to catch your peers’ attention, be memorable, and have them approach you for business? Most importantly, what can you do to get every business card in the room wanting what you have (so you can go to fewer networking meetings and get back to running your business)?

The good news is you don’t have to be a poet, a writer, or a great speaker in order to attract attention and desire. All you need to do is put yourself in your potential customer’s shoes for a minute. What is it about your business, your products and services, and you that would interest a potential buyer? Why should they care? Why should they stop what they’re doing from their busy life and listen to you? It’s easier to answer than it sounds. Here’s a formula to help you along.

“I help “my ideal client” “get a certain result” through “my products or services.”

Let’s fill in these three blanks by using some examples:

• I help “young families” “find their first house” by “providing mortgage lending services.”

• I help “people with broken pipes” “keep their homes dry” through my “plumbing services.”

• I “protect families from financial disaster in times of crises” by providing “insurance services.”

• I help “women who want to have beautiful hair” “keep their hair healthy and vibrant” with “my all-natural, organic hair salon services.”

Now fill in the blanks for your business. You may have to try a couple of variations until you hit on the perfect one for you. But this formula beats saying “I’m a hairdresser,” “I’m a plumber,” or “I’m a mortgage lender.”

This is a great start to your elevator speech, but just a start. Now add a second sentence that describes a project you just completed with another client similar to the one you’re talking with.

“For example, I just closed on a home last week with a mom, dad, the cutest 4-year-old twins, and a yorkie. They got a great rate, and their payment is low enough so they can afford to start saving for the kids’ college right away.”

One more sentence and you’re done. This one’s your call to action. What do you want interested prospects to do, and how can they sample your product at a low risk to them?

“I have a free report, “10 Mistakes to Avoid When Buying Your First House.” If you’d like a copy, please hand me your business card and I will email you the details.”

“I offer a free risk analysis so you can see if you have any major risk exposures. To set up an appointment, hand me your business card, and I will get you setup free of charge.”

Put all three parts together and you have a very nice elevator speech.

“I help young families find their first house by providing mortgage lending services. For example, I just closed on a home last week with a mom, dad, the cutest 4-year-old twins, and a yorkie. They got a great rate, and their payment is low enough so they can afford to start saving for the kids’ college right away. I have a free report, 10 Mistakes to Avoid When Buying Your First House. If you’d like a copy, please hand me your business card and I will email you the details.”

Don’t be surprised at the flood of business cards that will come your way when you put this in action at your future networking meetings.

***

QuickBooks Payroll Runs: Easy, Fast, Accurate

If you’ve already set up your QuickBooks employee and company payroll files, the hard part’s over.
It’s not just a catchy ad slogan: It’s true. Unless you have dozens of employees or numerous exceptions each payday, you can literally process a payroll run in just a few minutes using the employee compensation tools in QuickBooks.
No matter which version of desktop QuickBooks you’re using, payday chores are similar. Even if you’ve subscribed to Full Service Payroll and are having most of the work done by Intuit, you still have to enter the number and type of hours worked for each pay period.
If you’re doing payroll manually or through a payroll service, you might be surprised at how quickly and easily your payroll tasks can be completed once you’ve finished entering information about your company and its employees, taxes and deductions.
A Simple Process
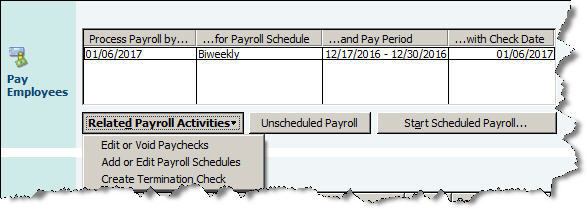
When you get a reminder that it’s time to run payroll, go to Employees | Pay Employees and choose Scheduled Payroll to get to this window:


Figure 1: No matter how many payrolls you’ve run, it’s important to verify that these dates are correct.

When you click Start Scheduled Payroll, a new screen displays your employee list in a spreadsheet grid. By default, QuickBooks displays several columns, including Employee, Regular Pay and Sick Hourly; you can opt to include others, like Employee Number. If you hide columns that contain information, that data will still be used in paycheck calculation. Then:
• Verify that the information at the top of the screen is correct (Payroll Schedule, Bank Account, etc.).
• Make sure that all employees to be paid have check marks next to their names.
• Enter the number of hours worked for each hourly employee, placing them in the correct pay type column.
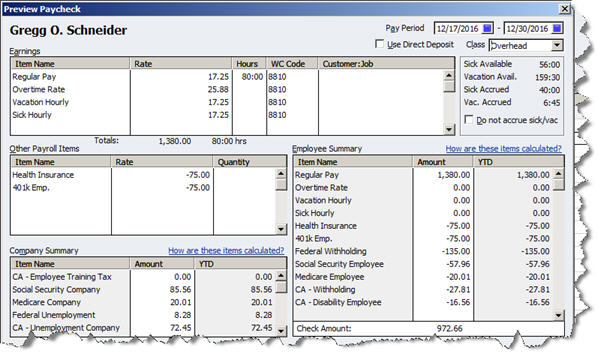
Select one and click Open Paycheck Detail to see a complete breakdown of compensation and withholding — all calculated automatically by QuickBooks based on your setup data — within the Preview Paycheck screen. Close the window when finished.


Figure 2: The Preview Paycheck screen shows the numbers behind the check amount.
Checking Your Work
If you’re satisfied that everything is correct, click Continue. In the next screen, you’ll verify Payroll Information again and check a box to indicate whether checks will be printed or handwritten (you can assign a starting check number to the latter). QuickBooks displays a grid containing each employee’s total gross pay, total taxes and deductions, net pay, employer taxes, contributions and total hours. The Direct Deposit field will be checked if the individual is signed up.
If you’re at all unsure that your payroll information is correct, you can click Finish Later. Otherwise, select Create Paychecks.
The Final Step
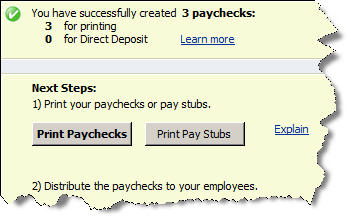
QuickBooks will then display your results:


Figure 3: Once you’ve previewed and approved a payroll, you can simply click to print any paper checks and pay stubs.
Check the box at the bottom of this window next to Do not advance the dates of this payroll schedule in the Payroll Center if you still have employees to process for this run. If the box isn’t checked, QuickBooks will change the dates in the Pay Employees window to reflect your next pay period.
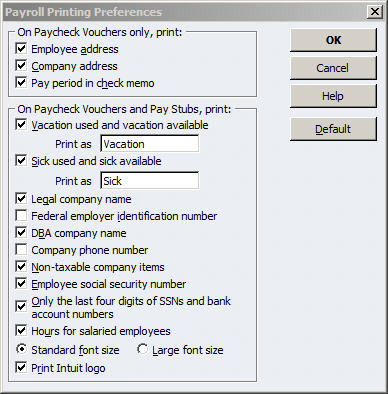
When you select Print Paychecks or Print Pay Stubs, the selection window opens. You can toggle among views of Paychecks, Direct Deposit or Both. Select the ones you want to dispatch and click Print or E-Mail. You’ll have the option to reprint any checks if you need to; otherwise, click OK.


Figure 4: Click Preferences in the print selection window to customize paycheck vouchers and pay stubs.
No Room for Errors
Sounds simple, and it is – as long as your setup was error-free. As you well know, you can’t make mistakes running payroll or you’ll initiate a whole series of incorrect numbers, making employees, benefits providers and government agencies unhappy.
So do not proceed if something doesn’t look right; QuickBooks always gives you an out. And let us know how we can help with setup, taxes or payroll runs – or anything in between.