Basic Bookkeeping | SBA Accounting and Tax Solutions (559) 369-7691

Modifying QuickBooks Reports Gives You Better Insight Into Past, Future: Part 1

If you make one resolution about improving your accounting procedures in 2013, it should be this: Make extensive use of the tools that QuickBooks offers for report modification. Comprehensive, meticulously-shaped reports that flow out of your carefully-constructed records and transactions are your reward for pounding on the keys every day, conscientiously recording income and expenses.

QuickBooks supplies you with a wide variety of pre-formatted reports whose modification options can help you do focused, critical analysis of your financial data. The right set of numbers will help you understand your history and plan for the future more effectively.

Note: The reports discussed and pictured here shows only one possible set of customization options. There are many variations. We can answer your questions.

Check your preferences

When you created your company file in QuickBooks, you chose between reporting on a cash (income and expenses are recorded when money changes hands) or accrual (recorded when you invoice or receive a bill) basis. This affects summary reports, but not those that break out individual transactions or are simply lists.

If you want to change this, click Edit | Preferences | Reports & Graphs | Company Preferences and click the desired button:
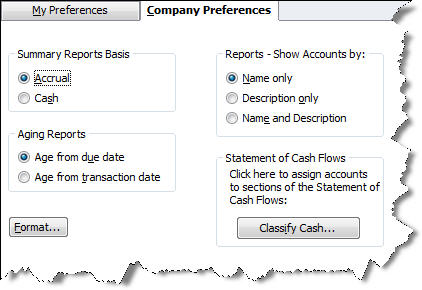

Figure 1: You can establish a preference for your summary reports’ basis here.

You can set other preferences in this window that will affect your report output here, too, as you can see.

Altering the display

Open the Income by Customer Summary report (Reports | Company & Financial). Change the dates to reflect a range you’d like to see. Want the data displayed by different time increments – like week or quarter – instead of just the total? Click the arrow next to Columns and select Four week.


Figure 2: You can do some report display alterations from this toolbar; the options it offers vary by report.

By default, your report rows display alphabetically. If you want to view a column by total in ascending or descending order, select the column by hovering over the top number until the magnifying glass appears, and click on it. Click the arrow next to Sort by and choose Total, then click the AZ [down arrow] icon (in some reports, there will be other options here).

Additional options in this toolbar let you:
• Memorize the report
• Print, email or export it to Excel
• Hide or Show the Header
• Collapse or Expand the columns
• Refresh the report if you’ve made changes that will alter data

More display options

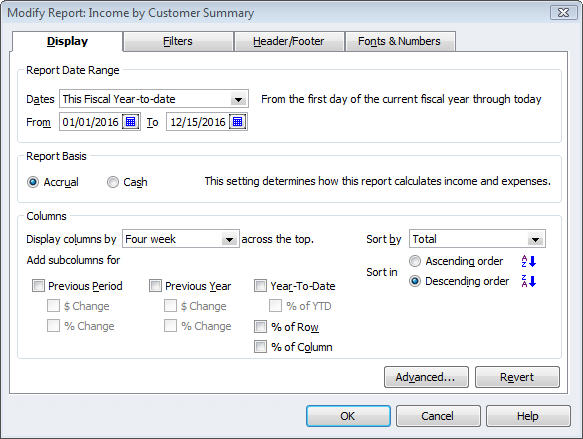
Click Customize Report to open this window:


Figure 3: This window outlines your report’s content options.

Some of the options here duplicate what you saw in the toolbar. In addition, you can switch between Accrual and Cash for just this report, and add subcolumns in some. The latter is a complicated operation, one that you must understand well in order to glean any insight from it. We can help you with this.

Sometimes the subcolumns are generic, as shown in the screen above. In other reports, they’re very specific to that group of data.

Clicking on Revert takes you back to the default format, and Advanced opens additional options specific to the current report.

More customization = more insightful results = more informed financial choices

Transaction reports have many similarities and two major differences: You can change the column order by hovering your cursor over the column label until a hand appears. Click, hold and drag the column to the desired spot and let go. You can also add or delete columns by clicking Customize Report and checking or unchecking labels.
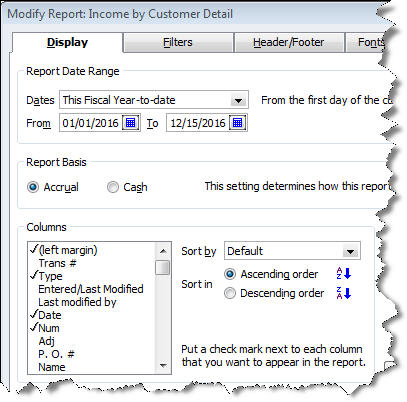

Figure 4: In transaction – or detail – reports, you can alter the column structure.

Learn the mechanics of report display modification well, and your company’s finances will come into much sharper focus, improving the wisdom of future choices. Up next month: filtering your reports for additional clarity.

If you have questions on this or any other QuickBooks feature, call or email us. We’re your partner and we’re here to make your business better.
 

QuickBooks 2013 Gives You A Reason To Upgrade

Tired of QuickBooks’ cramped, claustrophobic screens and uneven interface? You’ll be pleased to see the 2013 version.
You chose QuickBooks for a variety of reasons, a major one being its simplicity and usability.
But the software is more than 20 years old now, and hundreds of features have been added over the years. QuickBooks looks old, tired and in need of a makeover.
Not anymore. Intuit has totally redesigned the program’s interface and navigational tools, providing a more consistent, streamlined, state-of-the-art look and feel. For the first time in a few years, there’s a compelling reason to consider moving up.

Figure 1: The QuickBooks 2013 home page.
Clean, Efficient, Customizable
What Intuit heard from customers was that they wanted a clean, simple experience. They wanted QuickBooks optimized for efficiency, and they wanted to be able to customize quickly.

So Intuit built a brand new interface, one that offers:
• An across-the-board, consistent look and feel
• A minimal learning curve, aided by familiar software conventions
• A clearer, more obvious workflow.
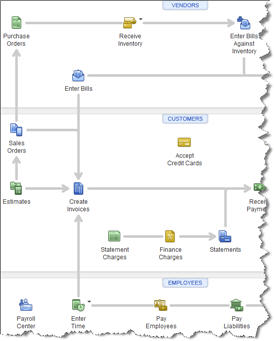
QuickBooks’ 2013′s dramatic changes are evident from its first screen. The home page has been cleaned up, and many icons removed (with their functions available elsewhere). But the interactive flowchart graphic is still there, along with icons for other commonly-used features.
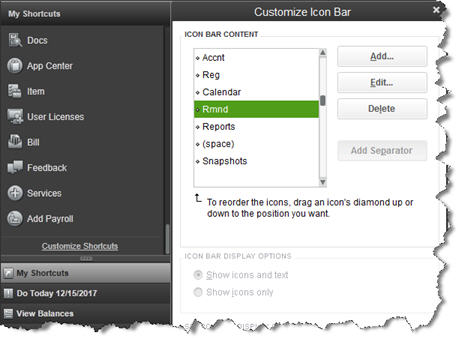
You can still use the software’s standard drop-down menus. But you now have a choice between the old horizontal Icon Toolbar and a new vertical navigational panel (or neither of the latter two). You can customize the new panel to give you quick access to the functions and reports you use most often, saving time and unnecessary clicking.

Figure 2: The new vertical navigational panel can be customized to display the icons you want.
Familiarity, and Clear Signals
Whether you just handle a subset of your company’s financial data or you’re the only one working with QuickBooks, your workflow will be faster and more intuitive.
QuickBooks 2013 uses colors and other visual cues to provide helpful hints and speed up your work. If the same option occurs within more than one screen, it’s always the identical color. When you’re completing an invoice, for example, the Save & New button is a bright blue color, as it is on many other screens. The Save & Close and OK icons are the same shade within the forms and records where they occur.
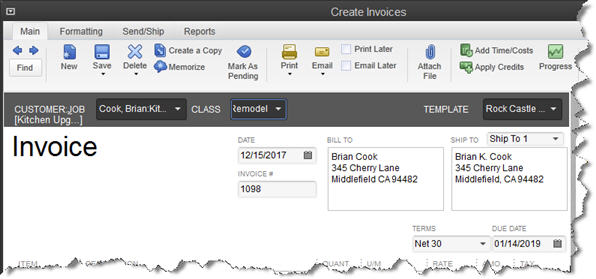
Color is also used to signify related actions in the new navigational Ribbon, a familiar interface convention that replaces the mismatched icons that used to be displayed at the top of transaction forms. In QuickBooks 2013, the icons for related tasks are the same color, and the graphics themselves are much cleaner and well-positioned.


Figure 3: QuickBooks 2013′s new navigational Ribbon is designed to accelerate workflow.
A Pleasure to Use
No area of QuickBooks remained untouched in this massive overhaul. Every screen has been modified to enhance readability and speed. Fonts look larger and clearer, and the overall design is more aesthetically pleasing.
So besides making your accounting chores zip along faster, the new look and navigation have a positive psychological effect: It’s simply more enjoyable and less frustrating to interact with QuickBooks 2013. Its more modern, attractive look has a lot of appeal.
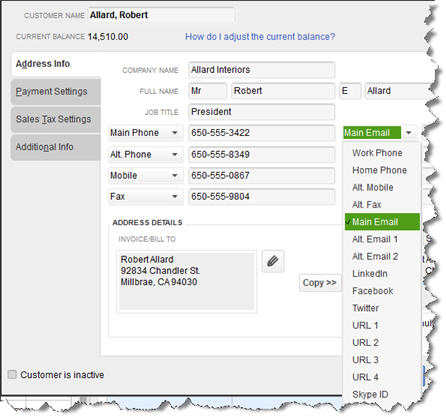
There are a few new things under the hood in this new version – it’s not just an interface update. For example, customer and vendor records are more flexible and thorough. You can attach to-do’s to them, assign multiple contacts and store more contact options, like Facebook addresses and Twitter handles.

Figure 4: Contact records in QuickBooks 2013 are more readable and thorough.
Starting Fresh
There are other changes that will make your work life easier, like one-click access to both the Intuit App Center (where you’ll find hundreds of integrated QuickBooks add-ons) and your most often-accessed reports.
The last few versions of QuickBooks have been rather ho-hum in terms of new usability and functionality. But we encourage you to seriously consider upgrading to QuickBooks 2013. We’d be happy to help you get up and running with it. Together, we can take a fresh look at your workflow to see if you and QuickBooks can build a better accounting experience.


Six Quick Productivity Tricks So You Can Go Home Early

If you have an endless to-do list, you’re not alone these days. Most of us are constantly looking for ways to work smarter and get more done. Here are six quick tips to help your productivity so you can go home early.

1. Group tasks

If you have lots of errands to run during the week, why not set aside one day or a part of a day to get them knocked out all at once? It saves start/stop time and may also save gas and time getting dressed up (if you work at home).

You can also try grouping tasks such as personal care appointments, doctor’s appointments, sales calls, and client visits. Your schedule will be freed up in big blocks of time so you can focus on creative projects without having to constantly watch the clock.

2. Use checklists

Checklists are best when you have a task you need to repeat. They’re great when you’re stressed and don’t want to forget a step (such as in packing your suitcase for a trip). They’re also great for tasks that repeat infrequently (Now how did I do that last time?)

Stop and take a minute to create your checklist the next time you perform a routine task that you will repeat in the future. You’ll thank yourself the next time.
3. Organize your email

If you are using Microsoft Outlook for email, consider getting it to work as hard as you do. As your email comes in, you can have Outlook sort the low-priority emails that come from lists, Google alerts, social media notifications, and subscriptions into folders. Create a subfolder in your inbox called “lists.” Then set a Rule to have that type of email go into the “lists” folder. This one step will substantially de-clutter your inbox.

4. Delegate more

If you’re a little wary about delegating, try this exercise: Look at your to-do list and put an hourly rate next to each task that you are doing. If someone paid you to do that job, what would you get on the market? Then look at the tasks with the lowest dollar value next to them.

If you feel your time is worth more than the lowest rated tasks on your lists, it’s time to help someone else out who is unemployed so you can be freed up to use your more valuable skills.

5. Order online

When is the last time you’ve been to the office supply or pharmacy when you know they deliver? (Yeah, me, too. Enough said.)

6. Avoid long learning curves

Whenever you realize a task will have a really long learning curve, then it’s a red flag that it’s time to find someone to hire to do it for you. Here are several examples:

• Doing your taxes and researching all the tax law changes
• Installing a new accounting system and customizing it
• Learning about every new social media platform out there
• Writing a legal contract
• Creating a report
• Troubleshooting a computer problem

The cost of going through the learning curve can be dozens of hours of your precious time lost compared to bringing an expert on board who can perform that task in a matter of hours or minutes.

How did these six ideas compare to your favorites? I hope you picked up an idea or two so you can get home earlier.

Seven Year-End Adjustments to Make to Your Books

Year-end is coming up for many businesses, and it’d be nice to know what your final revenue and profit numbers will be for the year. Before we can calculate these key numbers, there are year-end adjustments that may need to be made to your books that will change the numbers. Here are seven common ones.

Bonuses

It’s great to give bonuses to employees at year-end, but it’s not so great to forget about the tax part of it. Bonus checks should always be run through payroll, but often are not, which requires an adjustment after the fact.

Retirement Plan Contributions

If cash is available at year-end, it’s a great idea to maximize the allowable deductions for the retirement plan you qualify for. One example is a SEP IRA. You can deduct up to 25% of your or your employee’s salary (up to $50,000 deduction maximum per employee for 2012, but please check with us for numerous exceptions and rules.

Withholding

If you are both the owner and an employee of your company and have not made enough tax payments throughout the year to account for all that money you’ve earned in 2012, you can adjust your last few paychecks to withhold the amount you need. Sometimes, this also reduces or eliminates the penalty for underpayment of estimated taxes. To find out more, please check with us.

Depreciation

If you have assets that will last longer than one year, such as factory equipment or a fleet of automobiles, an adjustment may need to be made to reduce the value of those assets. This adjustment will reduce your profit and will also reduce your tax bill.

Amortization

If you have a loan of any type, the payment consists of both principal and interest. Each time you make a payment, the principal and interest amounts can vary. At the beginning of the loan, you pay more interest and less principal. At the end of a loan, it’s reversed. Each payment is different, and if they haven’t been recorded correctly each month, it’s time to make the adjustment so that the loan balance is correct.

New Acquisitions or Obligations

If you’ve made a significant acquisition, such as real estate, buildings, large equipment, or another company, and somehow the transaction did not get properly recorded on your books, then now is the time. Similarly, if you’ve taken on new debt, the new liability needs to be put on the books.

Noncash Transactions

It’s easy to overlook transactions that do not require a cash outlay, but these need to be recorded as well. For example, if you performed consulting services in exchange for a spa gift certificate, this transaction should be reflected in the proper revenue and expense accounts.

Year-End Profit

Once your books are adjusted for all of these changes, you’ll have all the information you need to find out how your business performed for 2012. You can then use your 2012 revenue and profit numbers to set new goals for 2013.

QuickBooks Payroll Runs: Easy, Fast, Accurate

If you’ve already set up your QuickBooks employee and company payroll files, the hard part’s over.
It’s not just a catchy ad slogan: It’s true. Unless you have dozens of employees or numerous exceptions each payday, you can literally process a payroll run in just a few minutes using the employee compensation tools in QuickBooks.
No matter which version of desktop QuickBooks you’re using, payday chores are similar. Even if you’ve subscribed to Full Service Payroll and are having most of the work done by Intuit, you still have to enter the number and type of hours worked for each pay period.
If you’re doing payroll manually or through a payroll service, you might be surprised at how quickly and easily your payroll tasks can be completed once you’ve finished entering information about your company and its employees, taxes and deductions.
A Simple Process
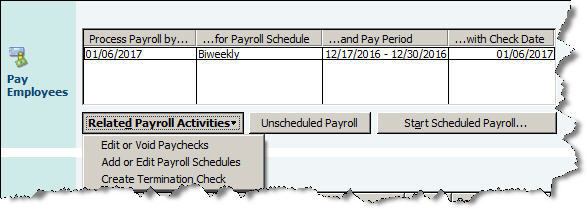
When you get a reminder that it’s time to run payroll, go to Employees | Pay Employees and choose Scheduled Payroll to get to this window:


Figure 1: No matter how many payrolls you’ve run, it’s important to verify that these dates are correct.

When you click Start Scheduled Payroll, a new screen displays your employee list in a spreadsheet grid. By default, QuickBooks displays several columns, including Employee, Regular Pay and Sick Hourly; you can opt to include others, like Employee Number. If you hide columns that contain information, that data will still be used in paycheck calculation. Then:
• Verify that the information at the top of the screen is correct (Payroll Schedule, Bank Account, etc.).
• Make sure that all employees to be paid have check marks next to their names.
• Enter the number of hours worked for each hourly employee, placing them in the correct pay type column.
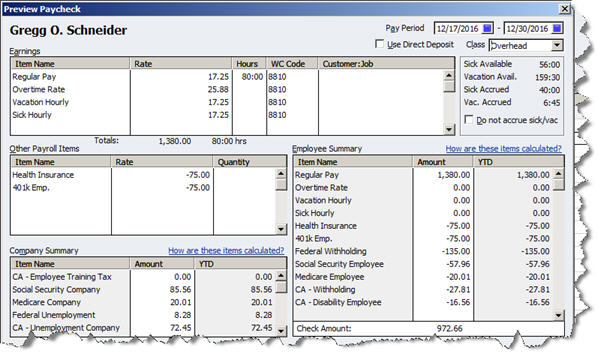
Select one and click Open Paycheck Detail to see a complete breakdown of compensation and withholding — all calculated automatically by QuickBooks based on your setup data — within the Preview Paycheck screen. Close the window when finished.


Figure 2: The Preview Paycheck screen shows the numbers behind the check amount.
Checking Your Work
If you’re satisfied that everything is correct, click Continue. In the next screen, you’ll verify Payroll Information again and check a box to indicate whether checks will be printed or handwritten (you can assign a starting check number to the latter). QuickBooks displays a grid containing each employee’s total gross pay, total taxes and deductions, net pay, employer taxes, contributions and total hours. The Direct Deposit field will be checked if the individual is signed up.
If you’re at all unsure that your payroll information is correct, you can click Finish Later. Otherwise, select Create Paychecks.
The Final Step
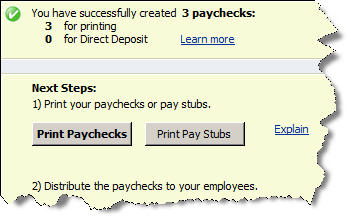
QuickBooks will then display your results:


Figure 3: Once you’ve previewed and approved a payroll, you can simply click to print any paper checks and pay stubs.
Check the box at the bottom of this window next to Do not advance the dates of this payroll schedule in the Payroll Center if you still have employees to process for this run. If the box isn’t checked, QuickBooks will change the dates in the Pay Employees window to reflect your next pay period.
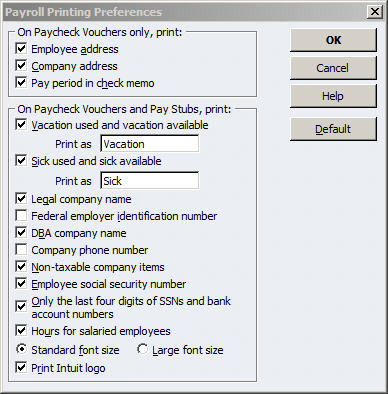
When you select Print Paychecks or Print Pay Stubs, the selection window opens. You can toggle among views of Paychecks, Direct Deposit or Both. Select the ones you want to dispatch and click Print or E-Mail. You’ll have the option to reprint any checks if you need to; otherwise, click OK.


Figure 4: Click Preferences in the print selection window to customize paycheck vouchers and pay stubs.
No Room for Errors
Sounds simple, and it is – as long as your setup was error-free. As you well know, you can’t make mistakes running payroll or you’ll initiate a whole series of incorrect numbers, making employees, benefits providers and government agencies unhappy.
So do not proceed if something doesn’t look right; QuickBooks always gives you an out. And let us know how we can help with setup, taxes or payroll runs – or anything in between.

Recognizing a Job Well Done


When was the last time you praised your employees or contractors? Hopefully, you’ve developed the good habit of frequently praising your team members, and if you haven’t, you’re certainly not alone. Most of us do not get enough praise, so there’s a strong likelihood there’s room for improvement when it comes to recognition of a job well done in just about every workplace. Here are some tips to praise more and help your workers flourish.

A Bias for Negativity and Criticism

Our brains are designed by evolution to feel the emotions from negative interactions, including criticism and especially threats, in an exaggerated fashion when compared to feeling the emotions from positive interactions. When we spotted a saber-toothed tiger, the brain that noticed and overreacted to the tiger by running away was rewarded with surviving.

That evolutionary trait doesn’t translate very well in the work environment we are in. It takes a larger quantity of positive interactions versus negative interaction to just keep us at a neutral baseline of emotions. And studies show we perform better when we are happy and positive. So that’s why recognition is so important in a thriving workplace.

Dos and Don’ts

Here are some guidelines to help you deliver the most effective recognition in your workplace:

1. Be as specific as possible.

Praise a specific task or interaction when possible rather than generalizing.

2. Direct the praise to a task or effort without listing personality characteristics, especially when you’re giving negative feedback.

For example, saying “The report was creased and had ink blotches on it” is better than saying “You are sloppy.”

3. Be timely in your praise.

Don’t wait a whole year to unload praises and criticisms on an employee. Let them know where they stand on a frequent basis, and if possible, praise them right after they do something great.

4. If you need to give negative feedback, sandwich it.

The sandwich refers to feedback that is first positive, second negative, and last positive. It’s important not to end on a negative note. A sandwich would go like this:

“Jim, I appreciate how hard you worked on the Cole case. You put in a lot of hours and showed dedication. In the restructuring section, I would have liked to see you ask for help earlier in the project. It would have avoided the delay we have now. The section on asset disposition was terrific; you really know your stuff in that area.”

5. Always give feedback in private.

It’s important to honor a worker’s privacy when it comes to performance appraisals and even daily or weekly feedback. If your employee is in a cubicle or other non-private area, you may need to find a place that is more private before you give feedback.

6. Never send negative feedback via email.

It can be really hurtful and is not appropriate at any time. If a face-to-face meeting is not possible and it just has to be handled right away, then pick up the phone.

7. Use examples.

When giving positive or negative feedback, give several examples of what’s right and wrong so the employee will learn faster and understand better what is expected.

8. Be supportive.

You are on the same team; to grow the company. The relationship should be supportive and not adversarial.

9. Explain the impact of actions.

Help the employee understand the downstream ramifications of their actions.

10. Encourage future behavior.

Use phrases like “I’d love to see you do more of that.”

Praise your team more often, and when you do, try these tips to watch your employees shine even more.

***